

Heads up before you scroll: Self-hosting n8n on Coolify is genuinely one of the best setups out there — but it does require a VPS, a domain, and about 30–45 minutes of your time. If you’d rather skip all of this and get a fully managed n8n instance live in seconds, check out n8n LaunchPad — starting at just $6/month, no server setup, no headaches.
If you’ve been Googling “how to self-host n8n” for longer than you’d like to admit, you’ve probably seen two types of guides: ones that throw a wall of Docker commands at you, and ones so vague they may as well say “just deploy it.”
This isn’t either of those.
This guide walks you through how to install n8n via Coolify — the cleanest, most beginner-friendly self-hosting method available right now — with real screenshots in mind, real decisions explained, and zero fluff. By the end, you’ll have a production-ready n8n instance running on your own server with HTTPS, PostgreSQL, and persistent storage.
Let’s get into it.
Table of Contents
What Is Coolify? (And Why Use It for n8n?)
Before we install anything, quick context.
Coolify is an open-source, self-hosted platform-as-a-service (PaaS). Think of it like your own private Heroku or Render — except it runs on your VPS and it’s free. It handles Docker under the hood, manages SSL certificates automatically via Traefik, sets up reverse proxies, and gives you a clean web dashboard to deploy and manage your apps.
Why does this matter for n8n?
Because installing n8n “the raw way” means manually writing Docker Compose files, configuring Nginx or Caddy as a reverse proxy, setting up SSL with Certbot, managing environment variables in .env files, and hoping nothing breaks when you restart the server. That’s a lot — especially if you’re not a developer.
Coolify takes all of that and wraps it in a point-and-click interface. You search for n8n, click deploy, add your domain, and you’re done. The SSL certificate is provisioned automatically. The reverse proxy is configured automatically. The environment variables have a clean UI.
It’s the best balance of control and convenience for self-hosting n8n right now.
What You’ll Need Before Starting
Don’t skip this part. Missing any of these will cause you to get stuck halfway through.
1. A VPS (Virtual Private Server)
You need a Linux server to run Coolify and n8n. Here’s what Coolify requires at minimum:
- OS: Debian 12 or 13 (recommended) or Ubuntu 22.04 or 24.04
- RAM: Minimum 2GB — but honestly, go with 4GB if you’re running n8n
- CPU: 2 cores minimum
- Storage: At least 30GB
- Open ports: 22 (SSH), 80 (HTTP), 443 (HTTPS), 8000 (Coolify dashboard)
Good VPS providers that work well for this:
- Hetzner — Best value in Europe, CAX11 starts around $4–5/month (ARM)
- Contabo — Reliable, beginner-friendly, ~$5–12/month
- Hostinger VPS — Budget-friendly, ~$5–15/month, also has a one-click Coolify setup option
- Vultr, DigitalOcean, OVH Cloud, InterServer — Solid alternatives
2. A Domain Name (Strongly Recommended)
Technically you can run n8n without one, but you’d be accessing it via an IP address with no HTTPS — which breaks webhooks and makes everything annoying. Get a domain. It doesn’t have to be your main domain; a subdomain on an existing domain works perfectly (like n8n.yoursite.com). You can grab a free .pp.ua domain at nic.ua
3. DNS Access
You’ll need to point an A record from your domain (or subdomain) to your VPS’s IP address. If you’re using Cloudflare for DNS (recommended), keep the proxy status as DNS Only (grey cloud) during setup — not proxied (orange cloud).
4. SSH Access to Your Server
You need to be able to connect to your VPS via terminal. On Mac/Linux or Windows, use just the built-in terminal or command prompt.
Step 1: Provision Your VPS and SSH In
Once you’ve purchased a VPS (we’ll use Debian 12 for this guide), you’ll get an IP address and root credentials from your provider.
Open your terminal and connect via SSH:
ssh root@YOUR_SERVER_IPYou’ll be prompted to enter your password, or if you set up SSH keys during VPS creation, it’ll connect automatically.
Once you’re in, run a quick system update before doing anything else:
apt update && apt upgrade -yThis updates your package list and upgrades existing packages. Takes a minute or two — let it finish.
Step 2: Install Coolify on Your VPS
Now the easy part. Coolify has a one-line install script that handles everything — Docker, Docker Compose, the Coolify app itself, and the initial configuration.
Run this command:
curl -fsSL https://cdn.coollabs.io/coolify/install.sh | bashThis script will:
- Install Docker and Docker Compose
- Pull the Coolify Docker image
- Set up Coolify to run automatically on boot
- Start Coolify on port 8000
The installation takes about 2–5 minutes depending on your server speed and location. When it’s done, you’ll see a success message.
Access the Coolify Dashboard
Open your browser and navigate to:
http://YOUR_SERVER_IP:8000⚠️ Note: At this point, you’re accessing it over HTTP on port 8000, not HTTPS. That’s fine for the initial setup. We’ll get HTTPS set up through your domain shortly.
You’ll land on the Coolify onboarding screen. Create your admin account — use a strong password and save it somewhere secure.
Once logged in, you’ll see the Coolify dashboard.

Optional but Recommended: Set Up a Domain for Coolify Itself
Before deploying n8n, you can configure a domain for Coolify’s own dashboard (e.g., coolify.yoursite.com). Go to:
Settings → General
Enter your Coolify domain here. Make sure your DNS A record for that subdomain already points to your server IP.
This gives you HTTPS access to the Coolify dashboard itself, which is cleaner for ongoing management.
Step 3: Add Your Server to Coolify
When you first access Coolify, it should automatically detect localhost as a server (since Coolify is running on the same machine). You’ll see it listed under Servers in the sidebar.
Click on it and verify that the connection status shows as Reachable. If it says “Unreachable,” click the Validate Server button and wait for it to check.
This is the server where all your apps (including n8n) will be deployed.
Step 4: Create a Project for n8n
Coolify uses “Projects” to organize your applications — similar to how you might organize different clients or environments in a folder structure.
- In the left sidebar, click Projects
- Click + Add (the plus button)
- Name your project something descriptive — n8n Production or Automation Stack works great
- Click Continue
You’ll land inside the project. Now you need to create or select an Environment. By default, there’s a production environment already there — use that.
Step 5: Deploy n8n as a Service
This is where the magic happens.
Inside your n8n Production project, under the production environment:
- Click + New Resource
- You’ll see a list of resource types — click Service
- A searchable catalog of apps appears
- Type n8n in the search bar
You’ll see three options for n8n in Coolify’s catalog:
| Option | Best For |
|---|---|
| n8n (default) | Quick start, Light usage, SQLite database |
| n8n with PostgreSQL | Production use — most people should pick this |
| n8n with PostgreSQL + Worker | High-volume, queue-based execution at scale |
For 90% of people reading this guide: choose “n8n with PostgreSQL.”
Here’s why: n8n’s default database is SQLite, which works fine for 5–10 workflows and personal use. But SQLite has a serious limitation — it can only handle one write at a time. If you have multiple workflows running simultaneously, or you plan to scale later, SQLite will bottleneck you. PostgreSQL handles concurrent writes properly and is what n8n’s own cloud product runs on.
Select n8n with PostgreSQL and click Continue.
Coolify will generate a complete Docker Compose configuration with sensible defaults — the n8n container, a PostgreSQL container, a Redis container (in some templates), and the networking between them.

Step 6: Configure Your n8n
After selecting n8n with PostgreSQL, you’ll land on the configuration page. This is the most important step to get right.
Look for the Services section in the General tab. You’ll see a randomly generated URL by default — something like https://abc123.yourdomain.tld.
Replace this with your actual n8n subdomain. Click the edit icon next to the generated URL and enter:
https://n8n.yourdomain.tld:5678(or whatever subdomain you chose). Dont worry you will be accessing n8n at n8n.yourdomain.tld
Make sure your DNS is already set up with an A record pointing n8n.yourdomain.com → your server’s IP address. If you haven’t done this yet, do it now and wait 5–10 minutes for propagation before deploying.
And also update your n8n image as latest from here


Step 7: Configuring the Environment Variables
Before you hit deploy, let’s make sure your environment variables are correct. In Coolify, go to the Environment Variables tab within your n8n service configuration.
The n8n + PostgreSQL template in Coolify should pre-populate most of these, but by default it chooses UTC as the time zone but if you prefer any other time zone, do change it in GENERIC_TIMEZONE and the TZ.
This variable tells n8n what its public URL is — without it, webhooks won’t work correctly. n8n generates webhook URLs using this value, so if it’s wrong or missing, external services won’t be able to trigger your workflows.

Step 8: Deploy n8n
Alright. You’ve configured your domain. Your environment variables are set. Persistent volumes are confirmed.
Time to hit Deploy.
Click the Deploy button in the top right corner of the service configuration page.
Coolify will now:
- Pull the latest n8nio/n8n Docker image
- Pull the PostgreSQL image
- Start all containers with your configured environment variables
- Configure Traefik to route your domain to the n8n container
- Automatically provision an SSL certificate via Let’s Encrypt
This process takes about 2–5 minutes depending on your server’s internet speed. You can watch the logs in real-time by clicking on the Logs tab.
What to look for in the logs:
✅ Good signs:
Database connection established
PostgreSQL connection successful
n8n ready on port 5678
Editor is now accessible via: https://n8n.yourdomain.tld
❌ Red flags:
SQLite mentioned in the logs (means PostgreSQL env vars aren't connecting)
ECONNREFUSED (connection refused — database not ready yet, try restarting)
Certificate error (DNS not propagated yet, wait and redeploy)
Step 9: Access n8n and Complete First-Time Setup
Once the deployment finishes and the status shows Healthy (green indicator), click on the Links tab in your service to find your n8n URL.
Open it in a new tab. You should see the n8n first-time setup screen.
Create Your Owner Account
Fill in:
- First name, last name
- Email address (this is your login email)
- A strong password
Click Next and you’ll land on your fresh n8n dashboard. Welcome to your self-hosted automation engine.
Activate Your Instance (Optional but Recommended)
n8n will show a popup asking you to activate your instance. This is for the free Community Edition license. You enter your email, they send you a license key, and you activate it. This unlocks a few extra features — specifically around user management and some enterprise-adjacent functionality.
You don’t need to activate to use n8n — it works fully without it. But it’s worth doing if you plan to use it seriously.
How to Update n8n on Coolify
One of the best things about this setup: updating n8n takes two clicks.
When a new n8n version is released:
- Go to your Coolify dashboard
- Find your n8n service
- Click Configuration → Advanced
- Click Pull Latest Images & Restart
Coolify will pull the latest n8nio/n8n:latest Docker image, stop the old container, and start the new one — while preserving all your persistent volume data (workflows, credentials, everything).
The whole thing takes 2–3 minutes. Zero data loss.
Tip: Want to pin a specific n8n version instead of always running latest? In your service configuration, change the image tag from n8nio/n8n:latest to something like n8nio/n8n:1.89.0 (use the version number from the n8n releases page). This gives you more control over when you update.

Is Self-Hosting n8n on Coolify Worth It?
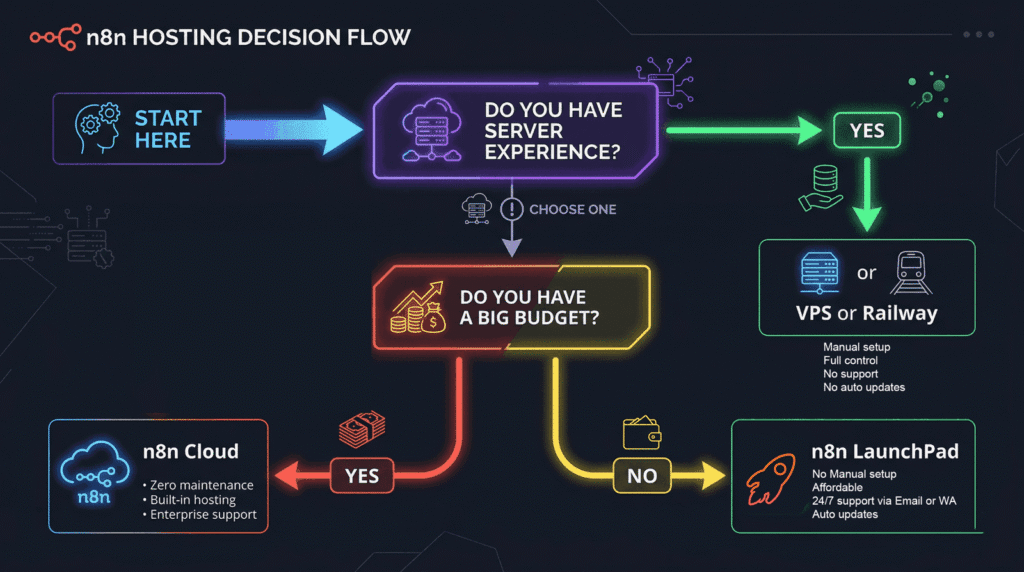
Honestly — it depends on where you are and what you need.
Self-hosting on Coolify is great if:
- You’re technically comfortable enough to manage a VPS (it doesn’t have to be much — you just need to not panic when something needs a restart)
- You’re running a high volume of executions and cloud costs are adding up
- You need full data privacy and can’t send data through third-party cloud services
- You want to host other tools alongside n8n (Coolify can deploy dozens of other apps on the same server)
The real cost of self-hosting:
Let’s be honest about this — there’s a cost beyond the monthly VPS bill.
- You’re responsible for uptime
- You need to monitor for disk space, memory, and container health
- You’ll spend time troubleshooting when something breaks
- Backups are your responsibility
For many people, especially when they’re getting started with n8n or running a smaller operation, that overhead isn’t worth it.
A cheaper, easier alternative:
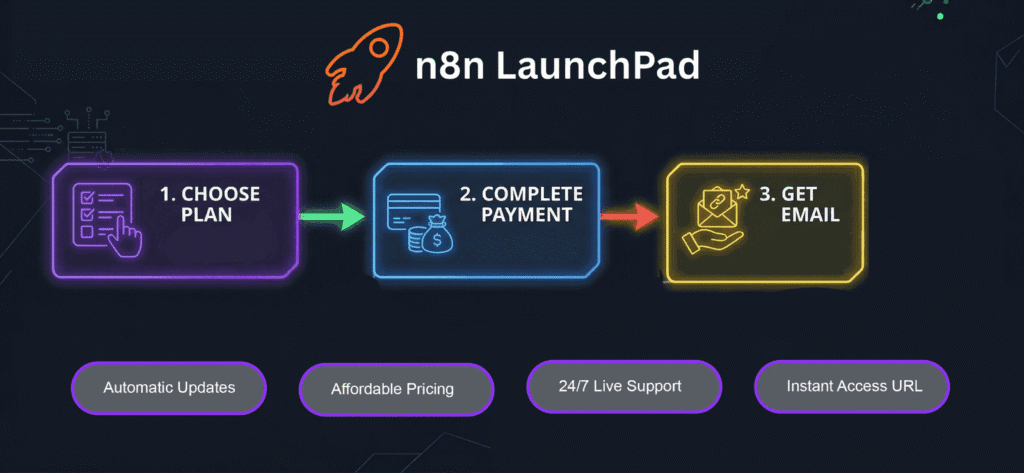
If you want the power of n8n without the server management overhead, n8n LaunchPad gives you a fully managed, pre-deployed n8n instance starting at just $6/month.
No VPS required. No Coolify setup. No SSL configuration. Just log in and start building workflows in 60 seconds.
It’s not for everyone — if you genuinely want infrastructure ownership, do the self-hosting route. But if you want to build automations (not manage servers), LaunchPad saves you hours of setup time and ongoing maintenance.
Frequently Asked Questions (FAQ)
What are the minimum server specs to run n8n on Coolify?
You need at least 2 CPU cores and 2GB of RAM, but 4GB RAM is recommended if you’re running n8n with PostgreSQL and any other services on the same server. For storage, start with 30GB — execution logs can grow over time, so you may want to configure log pruning in n8n’s settings (EXECUTIONS_DATA_MAX_AGE and EXECUTIONS_DATA_PRUNE=true).
Do I need to know Docker or Linux to install n8n on Coolify?
Not deeply. You need to know how to SSH into a server, run a single install command, and follow a web interface. If you’ve used cPanel or any web hosting dashboard before, Coolify’s UI will feel familiar. You don’t need to write Dockerfiles or edit compose files manually — Coolify handles all of that.
Which n8n template should I choose in Coolify — default, PostgreSQL, or PostgreSQL with Worker?
For almost all use cases, n8n with PostgreSQL is the right choice. The default template uses SQLite which is only suitable for quick testing. The PostgreSQL + Worker variant adds Redis and queue-mode execution — useful if you’re running high-volume production workflows (50,000+ executions/month) but overkill for most setups.
How much does it cost to self-host n8n on Coolify?
The total cost is roughly $5–15/month, depending on your VPS provider and plan size. Hetzner’s CAX11 ARM plan is popular at around $4–5/month and handles n8n + PostgreSQL with room to spare. Add a domain (~$10–15/year) and you’re looking at under $10/month total. Coolify itself is free and open-source.
Is the n8n data safe if my container restarts?
Yes — as long as persistent volumes are configured correctly (which Coolify’s template does by default). Your workflows, credentials, and execution history are stored in the PostgreSQL data directory and n8n’s config directory, both of which are mounted as volumes outside the container. Container restarts don’t affect them.
Can I run multiple n8n instances on the same Coolify server?
Yes. Coolify can deploy multiple services on one server. You’d create separate projects/environments and deploy separate n8n instances, each with their own database and domain. Whether your server has enough resources to handle multiple instances is another question — you’d want at least 8GB RAM for two full n8n + PostgreSQL stacks.
What happens to my workflows when I update n8n?
Nothing bad. When you update via Coolify’s “Pull Latest Images & Restart,” the container is replaced but the persistent volumes remain intact. Your workflows, credentials, and settings survive the update. It’s always good practice to test a critical workflow after updating, but updates are generally safe.
Can I use Cloudflare with this setup?
Yes, with one important caveat: set your DNS record to “DNS Only” (grey cloud) during initial setup, not “Proxied” (orange cloud). Cloudflare’s proxy can interfere with Coolify’s SSL certificate provisioning via Let’s Encrypt. Once everything is working, you can switch to Proxied if you want Cloudflare’s CDN and security features — but you’ll need to set the SSL/TLS mode to Full (Strict) in Cloudflare’s settings.
How do I back up my n8n data?
Coolify has built-in backup functionality for databases. You can also set up a cron-based backup using Coolify’s scheduled tasks. At minimum, regularly export your workflows from inside n8n’s UI (Settings → Import/Export) and store them somewhere safe. For a proper production backup, set up a PostgreSQL dump to an external storage location (like an S3 bucket) on a schedule.
My n8n instance keeps running out of disk space. What should I do?
This is usually caused by n8n’s execution logs accumulating over time. Set these environment variables to enable automatic pruning:
EXECUTIONS_DATA_PRUNE=true
EXECUTIONS_DATA_MAX_AGE=336 # in hours = 14 days EXECUTIONS_DATA_PRUNE_MAX_COUNT=10000
You can also run Docker system cleanup from Coolify’s server settings to remove unused images and containers.
What’s Next After Installation?
You’ve got n8n running. Now what?
Explore n8n’s template library — n8n has hundreds of pre-built workflow templates. Start with something small: an email notification workflow, a data sync between two apps, a simple webhook handler.
Install custom nodes — n8n’s community has built hundreds of extra integrations not in the default install. Go to Settings → Community Nodes inside n8n to browse and install them.
Set up SMTP for email — If you want n8n to send emails directly (for alerts, notifications), configure SMTP under Settings → Email in n8n.
Enable queue mode for scale — If you eventually outgrow a single n8n container, Coolify’s “n8n with PostgreSQL + Worker” template adds Redis-based queue mode, allowing you to run workflows in parallel across multiple workers.
Monitor your instance — Coolify’s dashboard shows container health, memory, and CPU usage. Keep an eye on it, especially when you first go live.
The Bottom Line
Installing n8n via Coolify is the smartest way to self-host right now. It cuts out 80% of the complexity of raw Docker setup while still giving you complete control over your data and infrastructure. Once it’s running, it basically runs itself.
That said — if you’re reading this and thinking “I just want to use n8n without the server stuff” — that’s completely valid. Not every automation builder needs to be a sysadmin.
n8n LaunchPad is built for exactly that scenario. Pre-deployed, fully managed, $6/month. You skip this entire guide and go straight to building.
Your call. Either way, you’re in the right ecosystem.
Have questions or ran into an issue not covered here? Drop a comment below — I try to reply to every technical question.