

So you’ve decided to self-host n8n on a VPS using Docker. Good call — it’s cheaper long-term, you own your data, and you’re not at the mercy of n8n Cloud’s pricing tiers.
But let’s be real: if you’ve never set up a Docker-based application on a Linux server before, this process can get a little hairy. A missing port, a wrong DNS record, or one bad line in your Compose file and you’re staring at a 502 error wondering what went wrong.
This guide is going to walk you through everything — from a fresh VPS to a fully running n8n instance with HTTPS — using Docker + Caddy as your reverse proxy. No Nginx config nightmares, no Certbot drama. Caddy handles SSL automatically.
If at any point you’re thinking “this is too much work for something I just want to run” — scroll to the bottom. There’s a managed alternative that gets you a live n8n instance in under 60 seconds. Let’s dive deep into how to install n8n via Docker.
Table of Contents
What You’ll Need Before Starting
Before running a single command, make sure you have these sorted:
| Requirement | Details |
|---|---|
| VPS | Any Linux VPS. Minimum 1 vCPU, 1GB RAM — but 2GB+ is strongly recommended |
| OS | Debian (Recommended) or Ubuntu |
| Domain or Subdomain | e.g. n8n.yourdomain.tld — you need to be able to edit DNS records |
| Open ports | Port 22, 80 and 443 must be accessible |
On VPS specs: If you’re running n8n on a 512MB RAM VPS, you’re going to have a bad time. n8n itself needs around 300–500MB at idle. Add Docker overhead and you’re already at the limit. I recommend at least 1GB RAM with a 2GB swap file (covered later in this guide).
Why Docker + Caddy for n8n?
Quick context before we dive into commands.
Docker lets you run n8n in an isolated container — no dependency conflicts, easy updates, easy rollbacks. Instead of installing Node.js, npm, and n8n globally on your server (which gets messy fast), Docker wraps everything into a clean, portable box.
Caddy is a modern web server that handles HTTPS automatically. Unlike Nginx, you don’t have to manually run Certbot or renew SSL certificates. You write a 4-line Caddyfile, and Caddy handles the rest. It provisions a Let’s Encrypt certificate on first startup and auto-renews it. For a solo developer self-hosting, this is a massive quality-of-life win.
The setup we’re building here: Caddy sits in front of n8n, handles all incoming traffic on ports 80/443, and forwards requests to n8n on its internal port 5678. Both run as Docker containers on the same network, so they can talk to each other by container name.
Step-by-Step: Installing n8n via Docker on a VPS
Step 1 — Point Your Domain DNS to Your VPS
This step trips up a lot of people. Your domain needs to point to your VPS IP address before Caddy can get an SSL certificate.
Log into wherever you manage your DNS (Cloudflare, Namecheap, GoDaddy, etc.) and add an A record:
| Type | Name | Value |
|---|---|---|
| A | n8n | YOUR.VPS.IP |
If your subdomain is n8n.yourdomain.tld:
- Name/Host: n8n
- Value: Your VPS’s public IP address
DNS propagation usually takes a few minutes to a few hours. You can check if it’s propagated using whatsmydns.net — search for your subdomain and confirm it resolves to your VPS IP.

Using Cloudflare? Make sure the proxy (orange cloud) is disabled (grey cloud / DNS only) initially. Cloudflare’s proxy can interfere with Caddy’s SSL certificate issuance. You can enable it later once n8n is confirmed working.
Step 2 — Update Your VPS
Always start fresh. Log into your VPS via SSH
ssh [email protected]and run:
sudo apt update && sudo apt upgrade -yThis updates the package list and upgrades all installed packages. The -y flag auto-confirms. Depending on your server, this can take 1–3 minutes.
Step 3 — Install Docker
n8n’s official installer script is the cleanest way to get Docker on Ubuntu or Debian:
curl -fsSL https://get.docker.com | sudo shThis single command downloads and runs Docker’s official installation script. It handles everything — adding the Docker apt repo, importing GPG keys, and installing docker-ce, docker-ce-cli, and containerd.io.
Why not sudo apt install docker.io? The docker.io package from Ubuntu’s default repos is often a version or two behind. Using Docker’s official script ensures you get the latest stable release.
Step 4 — Enable and Start Docker
Install doesn’t mean running. Enable Docker so it starts automatically on reboot, and start it now:
sudo systemctl enable docker && sudo systemctl start dockerStep 5 — Create a Dedicated n8n Folder
Keep things organized. Create a folder for your n8n setup and navigate into it:
mkdir ~/n8n && cd ~/n8nAll your config files, Compose file, and persistent data will live here. If you ever need to back up or migrate your n8n instance, you just zip this entire folder.
Step 6 — Create the Docker Compose File
Docker Compose lets you define multiple containers (n8n + Caddy) in a single YAML file and spin them up together.
nano docker-compose.ymlPaste the following inside:
services:
  n8n:
    image: n8nio/n8n:latest
    restart: unless-stopped

    environment:
      - N8N_HOST=n8n.yourdomain.tld
      - N8N_PROTOCOL=https
      - WEBHOOK_URL=https://n8n.yourdomain.tld/
      - TZ=UTC
      - GENERIC_TIMEZONE=UTC

    volumes:
      - ./n8n_data:/home/node/.n8n

    networks:
      - n8n

  caddy:
    image: caddy:latest
    restart: unless-stopped

    ports:
      - "80:80"
      - "443:443"

    volumes:
      - ./Caddyfile:/etc/caddy/Caddyfile
      - caddy_data:/data
      - caddy_config:/config

    networks:
      - n8n

networks:
  n8n:

volumes:
  caddy_data:
  caddy_config:
Replace n8n.yourdomain.tld with your actual subdomain in all three places it appears.
A few things worth understanding here:
- restart: unless-stopped — n8n and Caddy auto-restart if the container crashes or the server reboots. This is what keeps your automation running 24/7.
- volumes: – ./n8n_data:/home/node/.n8n — This mounts a local folder (n8n_data) into the container. Your workflows, credentials, and settings persist here even if you delete and recreate the container.
- TZ=UTC and GENERIC_TIMEZONE=UTC — Keep this as UTC unless you have a specific reason to change it. Using a non-standard timezone can cause scheduling issues with cron-based triggers.
- Shared n8n network — Both containers are on the same Docker network. This means Caddy can reach n8n by its container name (n8n:5678) without exposing port 5678 to the public internet.
Save and exit: Ctrl+X → Y → Enter
Step 7 — Create the Caddyfile
Now create the reverse proxy config for Caddy:
nano CaddyfilePaste this:
{
    email [email protected]
}

n8n.yourdomain.tld {
    reverse_proxy n8n:5678
}
Replace both placeholders:
- [email protected] → your actual email (used for Let’s Encrypt certificate notifications)
- n8n.yourdomain.tld → your actual subdomain (same as in docker-compose.yml)
That’s it. Caddy reads this file, obtains an SSL certificate from Let’s Encrypt using your email, and proxies all traffic to n8n’s container on port 5678. No manual certificate management needed, ever.
Save and exit: Ctrl+X → Y → Enter
Step 8 — Start Everything
Fire it up:
mkdir -p n8n_data && sudo chown -R 1000:1000 n8n_data && docker compose up -dThe -d flag runs containers in detached mode (background). You’ll see Docker creating the network, volumes, and starting both containers.
Check that both containers are running:
docker compose psYou should see two containers — n8n-n8n-1 and n8n-caddy-1 — both with status Up.
Check n8n logs to confirm it started cleanly:
docker compose logs n8n --tail=50Look for something like:
Editor is now accessible via:
https://n8n.yourdomain.tld/
That means n8n is running. Now open your browser and go to https://n8n.yourdomain.tld.
Troubleshooting Common Issues
Things don’t always work first try. Here’s what to do when they don’t.
n8n Container Keeps Restarting
Run docker compose logs n8n –tail=100 and look for errors. Common causes:
- Permission issue on n8n_data folder — The n8n container runs as user 1000:1000. If the folder was created as root, permissions will clash.
Fix it with:
docker compose down && rm -rf n8n_data && mkdir n8n_data && sudo chown -R 1000:1000 n8n_data && docker compose up -dThis is the nuclear option that resolves 90% of permission-related startup failures. It wipes the data folder and recreates it with correct ownership.
502 Bad Gateway or “Site Can’t Be Reached” (Most common)
This is the most common error. Work through this checklist:
- Is your DNS propagated? Use nslookup n8n.yourdomain.tld and check if it returns your VPS IP. If not, wait and try again.
- Are ports 80 and 443 open? Check your firewall.
- Is n8n actually running? Run docker compose ps — both containers should show Up.
- Is Caddy getting an SSL cert? Check Caddy logs: docker compose logs caddy –tail=50. Look for errors related to ACME/certificate issuance.
Caddy Can’t Get SSL Certificate
Common cause: DNS isn’t pointing to your VPS yet, or Let’s Encrypt rate limits.
Caddy logs will tell you: docker compose logs caddy –tail=50
If you see a rate limit error, wait a few hours. Let’s Encrypt allows 5 certificate requests per domain per hour. If you’re repeatedly failing and retrying, you can hit this limit fast.
n8n Works But Webhooks Aren’t Triggering
Check your WEBHOOK_URL environment variable in docker-compose.yml. It must match your domain exactly, including the trailing slash:
- WEBHOOK_URL=https://n8n.yourdomain.tld/Restart after any changes:
docker compose down && docker compose up -dSetting Up Swap (Strongly Recommended for Small VPS)
If you’re running this on a 1GB RAM VPS, add a 2GB swap file. This gives your server virtual breathing room when n8n spikes memory usage during heavy workflow execution.
Create and Enable 2GB Swap
Just paste this one line command
sudo fallocate -l 2G /swapfile && sudo chmod 600 /swapfile && sudo mkswap /swapfile && sudo swapon /swapfile && echo '/swapfile none swap sw 0 0' | sudo tee -a /etc/fstabVerify swap is active:
free -hYou should now see swap listed with ~2GB available.

Swap isn’t a substitute for RAM — it’s much slower since it uses disk. But it’s the difference between your server surviving a memory spike and crashing with an OOM (Out of Memory) kill.
Keeping n8n Updated
Since we used n8nio/n8n:latest, updating n8n means pulling the new image and recreating the container.
cd n8n && docker compose pull && docker compose down && docker compose up -dYour workflows and data are safe — they’re in the n8n_data volume which is mounted from your local disk.
Tip: Don’t use n8n:latest in production if you want stability. Pin to a specific version like n8nio/n8n:2.XX.X so you don’t get unexpected breaking changes on update. Check the n8n releases page for the latest stable version.
Use the following command to delete old n8n version and cleanup all the docker useless things
docker system prune -aHonestly? This Is a Lot of Work
Let’s be straight about something. This entire guide — VPS setup, Docker, Caddy, DNS, firewall, permissions, swap — takes anywhere from 30 minutes to several hours depending on your experience level. And that’s assuming nothing goes wrong.
Then factor in: monthly VPS costs, renewal reminders, Docker updates, n8n version upgrades, occasional server crashes, backup management…
Self-hosting is great if you enjoy infrastructure. But a lot of people who want to use n8n don’t want to operate a server. They just want to build automations.
That’s exactly why we built n8n LaunchPad.
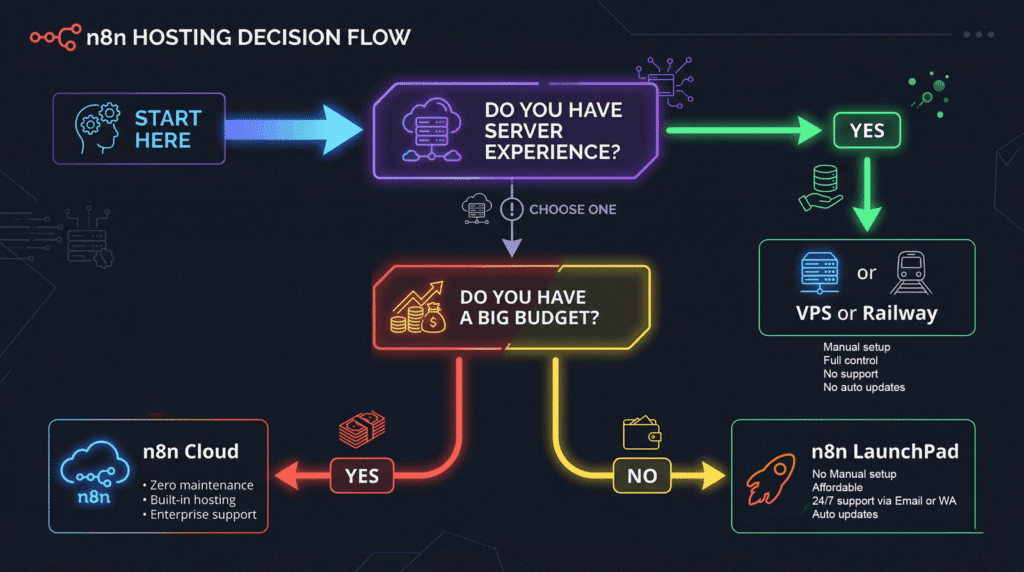
The Managed Alternative: n8n LaunchPad
n8n LaunchPad gives you a fully managed, pre-deployed n8n instance — no VPS, no Docker, no Caddyfile, no DNS records.
You sign up → you get a live n8n instance → you start building workflows.
That’s it.
| Feature | Self-hosted Docker | n8n LaunchPad |
|---|---|---|
| Setup time | 30min–3hrs | Under 30 seconds |
| Technical knowledge needed | Linux, Docker, DNS basics | None |
| SSL/HTTPS | Manual (Caddy handles it) | Included |
| Server maintenance | You | Us |
| Updates | Manual | Automatic |
| Starting price | VPS cost ($4–$12/mo) + your time | $6/month |
| Data ownership | Full | Full |
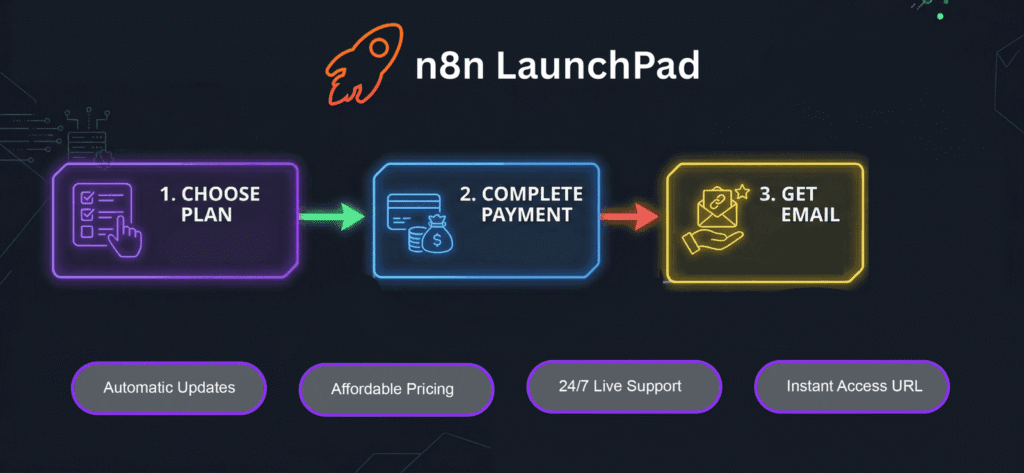
Starting at $6/month. No server skills needed.
Frequently Asked Questions
Is Docker the best way to self-host n8n?
For most people, yes. Docker keeps n8n isolated from your server’s system packages, makes updates cleaner, and makes backup/migration much easier. The main alternative is installing n8n globally via npm, but that comes with Node.js version conflicts and messier upgrade paths. Docker + Compose is the closest to a “production standard” for personal self-hosting.
Do I need a dedicated VPS just for n8n?
Not necessarily. If you already have a VPS running other things, you can add n8n to it — as long as you have enough RAM (1GB free minimum). Just make sure there’s no port conflict on 80/443 if you’re already running another web server.
Can I run n8n on a $4/month VPS?
Technically yes, but barely. A 1GB RAM VPS will constantly struggle. You’ll get random crashes, slow UI, and failed workflow executions. 1GB RAM with 2GB swap is the realistic minimum. If you’re serious about running n8n reliably for daily automation, go with 2GB RAM or use a managed service like n8n LaunchPad.
Why Caddy instead of Nginx?
Caddy’s automatic HTTPS is the killer feature for this use case. With Nginx, you’d need to configure server blocks, install Certbot, run it, set up a cron job for auto-renewal. With Caddy, you write 4 lines and it handles everything. For a single-service setup like this, Caddy is significantly simpler with no real downsides.
How do I update n8n after installing via Docker?
Run this one line command from your ~/n8n folder (You can go to folder by cd n8n):
docker compose pull && docker compose down && docker compose up -d
What happens to my workflows if my VPS crashes?
If your VPS crashes and restarts, Docker will automatically bring your containers back up (because of restart: unless-stopped). Your workflows are stored in the n8n_data folder on disk — they survive container restarts. The only risk is if the disk itself fails or someone nukes your VPS. That’s why regular backups of n8n_data matter.
Is self-hosting n8n secure?
It’s as secure as you make it. Basics: keep your VPS updated, don’t expose port 5678 publicly (let Caddy handle everything), use a strong n8n owner password, and keep n8n updated. If you want to go further, add fail2ban, change your SSH port, and disable root login. The default setup in this guide is reasonably secure for most use cases. Turn Off you SSH firewall if your VPS provider supports managed Firewall (So when you need SSH you can simply turn on that)
What’s the difference between n8n Cloud and n8n LaunchPad?
n8n Cloud is the official hosted version by n8n.io — starts at around $20/month with execution limits. n8n LaunchPad is a third-party managed hosting provider that gives you a self-hosted n8n instance (fully yours, no execution limits on workflows) starting at just $6/month. Think of it as the middle ground: managed infrastructure, self-hosting pricing.
Can I use this setup for production webhooks?
Yes, this is production-ready. The WEBHOOK_URL environment variable tells n8n which URL to expose for incoming webhook triggers. Make sure it matches your domain exactly (with trailing slash). Test your webhooks after setup with a simple HTTP request workflow before going live.
Wrapping Up
You now have a working n8n instance running via Docker on your VPS with automatic HTTPS via Caddy. It’s a solid setup that’ll serve you well for personal automation, side projects, and small team workflows.
Quick recap of what we covered:
- Updated the VPS and installed Docker
- Created a Docker Compose file with n8n + Caddy
- Configured the Caddyfile for automatic SSL
- Set up DNS and firewall rules
- Started the stack and verified it’s running
- Added swap for VPS stability
- Covered troubleshooting for the most common failure points
If you ran into issues at any step, drop a comment below — I’ll try to help debug.
And if you decided this setup isn’t worth the hassle for what you’re trying to build — that’s a completely valid call. n8n LaunchPad exists for exactly that reason. Starting at $6/month, fully managed, live in under a minute.